Log #37 · Sep 27, 2026
Automatic Plant Watering System
Build a soil-moisture-controlled watering system with a capacitive sensor, a relay or MOSFET, a small pump and Arduino code with safety limits.
This project waters a potted plant only when its soil is actually dry. A sensor in the soil measures moisture, the Arduino decides whether water is needed, and a small pump delivers a measured amount from a reservoir. It is a practical build that teaches analog sensing, switching a load with a transistor or relay, and writing code that fails safely. It also keeps your basil alive while you are on holiday.
Parts list
| Part | Quantity | Notes |
|---|---|---|
| Arduino Uno or Nano | 1 | |
| Capacitive soil moisture sensor (v1.2 or v2.0) | 1 | Avoid the two-prong resistive type |
| 3–6 V mini submersible pump | 1 | With silicone tubing |
| Logic-level N-channel MOSFET (e.g. IRLZ44N) or a 5 V relay module | 1 | |
| 1N4007 diode | 1 | Only for the MOSFET version |
| 220 Ω and 10 kΩ resistors | 1 each | Only for the MOSFET version |
| 5 V supply, 1 A or more | 1 | USB adapter works |
| Water container, tubing, a stake to hold the tube |
Why a capacitive sensor
Cheap two-prong resistive sensors pass current through the soil. That corrodes the metal within weeks, and the readings drift. Capacitive sensors measure moisture through a protective coating, with no exposed metal in the soil, so they last much longer. They output an analog voltage: higher when dry, lower when wet.
How it works
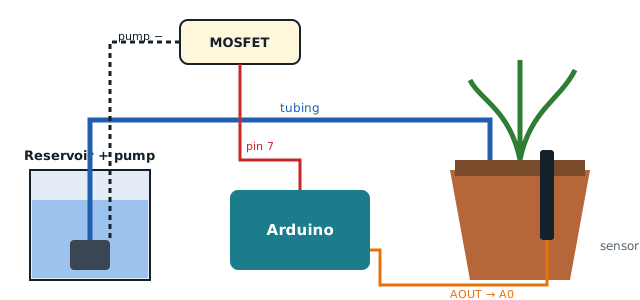
- Every minute, read the moisture sensor.
- If the soil is drier than a threshold, run the pump for a fixed time, such as 3 seconds.
- Wait for the water to soak in before checking again.
- Never water more than a set number of times per day, in case something goes wrong.
Wiring
Sensor: VCC to 5 V, GND to GND, AOUT to A0.
Pump with a MOSFET (quieter and smaller than a relay):
- Pump + to 5 V supply +
- Pump − to MOSFET drain
- MOSFET source to GND
- MOSFET gate to Arduino pin 7 through a 220 Ω resistor, with a 10 kΩ resistor from gate to GND so the pump stays off during boot
- 1N4007 diode across the pump, stripe toward +, to absorb the voltage spike when the motor switches off
Or with a relay module: VCC to 5 V, GND to GND, IN to pin 7, and wire the pump's + lead through the relay's COM and NO terminals. Many relay modules are "active low", switching on when the input is LOW, so test yours.
Power the pump from the supply, not from an Arduino pin, and join the grounds. The reasons are covered in how to power an Arduino project.
Calibrating the sensor
Every sensor and soil type reads a bit differently, so calibrate before trusting the numbers:
- Upload a sketch that prints
analogRead(A0)every second (see our analog pins guide). - Note the value with the sensor in dry air, around 520–600 on many sensors.
- Note the value with the sensor in a glass of water, up to the marked line, around 250–300.
- Push it into freshly watered soil and note that value too.
Use these to set your "dry" threshold, typically about 60% of the way from wet to dry.
The code
const int SENSOR = A0;
const int PUMP = 7;

const int AIR_VALUE = 560;      // your dry-air reading
const int WATER_VALUE = 270;    // your in-water reading
const int DRY_PERCENT = 35;     // water when moisture falls below this

const unsigned long CHECK_EVERY = 60000UL;   // 1 minute
const unsigned long PUMP_MS = 3000;          // 3 s of watering
const unsigned long SOAK_MS = 600000UL;      // wait 10 min after watering
const int MAX_WATERINGS_PER_DAY = 4;

int wateringsToday = 0;
unsigned long dayStart = 0;

int moisturePercent() {
  long sum = 0;
  for (int i = 0; i < 10; i++) { sum += analogRead(SENSOR); delay(20); }
  int raw = sum / 10;
  int pct = map(raw, AIR_VALUE, WATER_VALUE, 0, 100);
  return constrain(pct, 0, 100);
}

void setup() {
  pinMode(PUMP, OUTPUT);
  digitalWrite(PUMP, LOW);
  Serial.begin(9600);
}

void loop() {
  if (millis() - dayStart > 86400000UL) {     // reset the daily counter
    dayStart = millis();
    wateringsToday = 0;
  }

  int m = moisturePercent();
  Serial.print("Moisture: "); Serial.print(m); Serial.println(" %");

  if (m < DRY_PERCENT && wateringsToday < MAX_WATERINGS_PER_DAY) {
    Serial.println("Watering");
    digitalWrite(PUMP, HIGH);
    delay(PUMP_MS);
    digitalWrite(PUMP, LOW);
    wateringsToday++;
    delay(SOAK_MS);                            // let water spread
  } else {
    delay(CHECK_EVERY);
  }
}
Why the safety limits matter
The soak delay and daily limit protect against the most likely failures: a sensor that falls out of the pot or a tube that slips and waters the floor. Without limits, a sensor lying in dry air would make the pump run all day and empty the reservoir onto your shelf.
Testing
- Test the pump alone in a bowl of water before connecting the plant.
- Check it primes: the pump must be fully submerged to push water.
- Run the full system with a short
CHECK_EVERYof 5 seconds, then return it to 60 seconds. - Watch the first few automatic waterings to check the amount is right.
Improvements
- Log temperature and humidity with a DHT22 from our temperature sensor comparison.
- Add a float switch or second moisture sensor in the reservoir to warn when it is empty.
- Add an OLED display showing moisture, using the display wiring from the digital thermometer project.
- Power the sensor from a digital pin and switch it on only while reading, to extend its life further.
— TheSolderBench · found a mistake? tell me