Log #38 · Sep 27, 2026
Digital Thermometer with an OLED Display
Build a waterproof digital thermometer with a DS18B20 probe and a 0.96 inch SSD1306 OLED, showing live temperature plus the minimum and maximum.
This project builds a compact digital thermometer that shows the current temperature in large digits along with the lowest and highest values since it was switched on. It uses a waterproof DS18B20 probe, so you can measure a fish tank, a fridge, a cup of coffee or the air outside. It is a satisfying first project to solder onto perfboard, and it introduces I2C displays, which you will use in many future builds.
Parts list
| Part | Quantity | Notes |
|---|---|---|
| Arduino Nano (or Uno) | 1 | Nano fits a small enclosure |
| DS18B20 waterproof probe | 1 | Three wires: red, black, yellow |
| 0.96" SSD1306 OLED, 128×64, I2C | 1 | Four pins: GND, VCC, SCL, SDA |
| 4.7 kΩ resistor | 1 | Pull-up for the DS18B20 data line |
| Push button | 1 | Resets the min/max values |
| Breadboard or perfboard, wires |
Why these parts
The DS18B20 is accurate to about ±0.5 °C over most of its range and comes sealed in a stainless-steel probe. Our temperature sensor comparison explains why it beats the LM35 and DHT22 for liquids and outdoor use.
The SSD1306 OLED is sharp, readable at an angle, needs no backlight and uses just two data wires over I2C, a bus where several devices share the same two lines, SDA (data) and SCL (clock), each with its own address.
Wiring
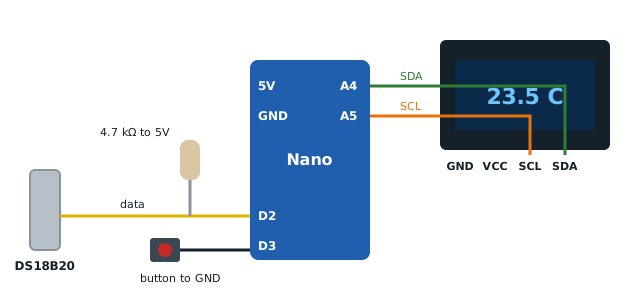
| Part | Pin | Arduino Nano / Uno |
|---|---|---|
| OLED | GND | GND |
| OLED | VCC | 5V |
| OLED | SDA | A4 |
| OLED | SCL | A5 |
| DS18B20 | Red | 5V |
| DS18B20 | Black | GND |
| DS18B20 | Yellow (data) | D2, plus 4.7 kΩ to 5V |
| Button | One side | D3 |
| Button | Other side | GND |
Some OLED boards order their pins VCC, GND instead of GND, VCC. Read the labels on yours before connecting; reversing power can damage the display.
Libraries
Install these from Sketch → Include Library → Manage Libraries:
- OneWire
- DallasTemperature
- Adafruit SSD1306 (install it with its dependency, Adafruit GFX)
The code
#include <Wire.h>
#include <Adafruit_GFX.h>
#include <Adafruit_SSD1306.h>
#include <OneWire.h>
#include <DallasTemperature.h>

Adafruit_SSD1306 oled(128, 64, &Wire, -1);
OneWire bus(2);
DallasTemperature probe(&bus);

const int RESET_BTN = 3;
float tMin = 1000, tMax = -1000;

void setup() {
  pinMode(RESET_BTN, INPUT_PULLUP);
  probe.begin();
  if (!oled.begin(SSD1306_SWITCHCAPVCC, 0x3C)) {
    while (true);                       // display not found: stop here
  }
  oled.setTextColor(SSD1306_WHITE);
}

void loop() {
  if (digitalRead(RESET_BTN) == LOW) { tMin = 1000; tMax = -1000; }

  probe.requestTemperatures();
  float t = probe.getTempCByIndex(0);

  oled.clearDisplay();
  if (t == DEVICE_DISCONNECTED_C) {
    oled.setTextSize(1);
    oled.setCursor(0, 24);
    oled.print("Probe not found");
    oled.setCursor(0, 36);
    oled.print("Check wiring + 4.7k");
  } else {
    tMin = min(tMin, t);
    tMax = max(tMax, t);

    oled.setTextSize(3);                // big current temperature
    oled.setCursor(0, 8);
    oled.print(t, 1);
    oled.setTextSize(2);
    oled.print(" C");

    oled.setTextSize(1);                // min and max underneath
    oled.setCursor(0, 48);
    oled.print("Min ");
    oled.print(tMin, 1);
    oled.setCursor(66, 48);
    oled.print("Max ");
    oled.print(tMax, 1);
  }
  oled.display();
  delay(1000);
}
Upload, and within a second the display shows the temperature in large digits. Hold the probe in your hand and watch it climb.
If the screen stays blank
- Wrong I2C address: most 128×64 modules use 0x3C, some use 0x3D. Upload the "i2c_scanner" example sketch to find yours.
- SDA and SCL swapped: swap A4 and A5.
- 128×32 module: change the height from 64 to 32 in the constructor.
- Low memory: the display buffer uses 1 KB of the Nano's 2 KB of RAM. If you add many features and the display fails to start, memory is the likely cause.
If the display shows "Probe not found", the 4.7 kΩ pull-up is missing or the data wire is on the wrong pin.
Making it permanent
Once it works on the breadboard, move it to a small perfboard. Solder female headers for the Nano and the OLED so both can be removed, then solder the resistor, button and probe wires. If you are new to soldering, read how to solder first and practice a few joints on scrap board. A small project box with a window for the display turns it into a finished tool.
Ideas to extend it
- Show °F as well with
t * 9.0 / 5.0 + 32. - Add a buzzer that sounds above or below a set temperature, useful for aquariums and fridges.
- Log readings to an SD card module.
- Run it from a single Li-ion cell with a small boost converter, as explained in voltage regulators explained.
— TheSolderBench · found a mistake? tell me