Log #74 · Oct 19, 2026
Saving Data with Arduino EEPROM (Settings That Survive a Reset)
Store settings, calibration values and counters in the Arduino's built-in EEPROM so they survive power-off: read, write, update, put and get explained, a settings struct example, and how to avoid wearing it out.
Every variable in your sketch disappears when the Arduino loses power. That's a problem when you've just calibrated a load cell, set a temperature threshold with a knob, or want to count how many times a door opened. The fix is already inside the chip: EEPROM, a small memory that keeps its contents with no power at all.
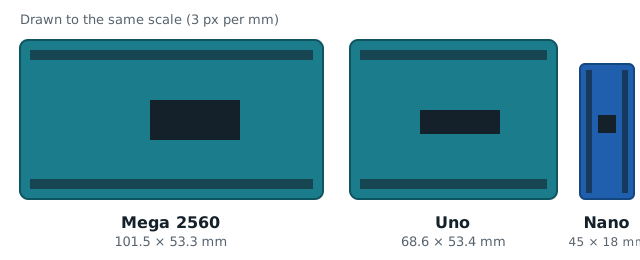
How much EEPROM do you have?
| Board | EEPROM size |
|---|---|
| Uno, Nano, Pro Mini (ATmega328P) | 1024 bytes |
| Mega 2560 | 4096 bytes |
| Leonardo, Micro | 1024 bytes |
| Nano Every | 256 bytes |
| ESP32, ESP8266 | no real EEPROM; emulated in flash (see below) |
1 KB isn't much, but it's plenty for settings: an int takes 2 bytes on these boards, a float 4.
The basic functions
Include the library with #include <EEPROM.h> (it comes with the Arduino IDE).
| Function | What it does |
|---|---|
EEPROM.read(addr) |
Read one byte |
EEPROM.write(addr, val) |
Write one byte (always writes) |
EEPROM.update(addr, val) |
Write one byte only if it changed: saves wear |
EEPROM.put(addr, var) |
Write any variable or struct (uses update internally) |
EEPROM.get(addr, var) |
Read any variable or struct back |
EEPROM.length() |
Size of the EEPROM in bytes |
A never-written EEPROM cell reads 255 (0xFF). Uploading a new sketch normally does not erase it, so data survives code updates too.
Example 1: a boot counter
#include <EEPROM.h>

void setup() {
  Serial.begin(9600);

  unsigned long boots;
  EEPROM.get(0, boots);
  if (boots == 0xFFFFFFFF) boots = 0;   // first run: EEPROM is blank

  boots++;
  EEPROM.put(0, boots);

  Serial.print("This board has started ");
  Serial.print(boots);
  Serial.println(" times");
}

void loop() {}
Press reset a few times and watch the number climb in the Serial Monitor.
Example 2: saving settings in a struct
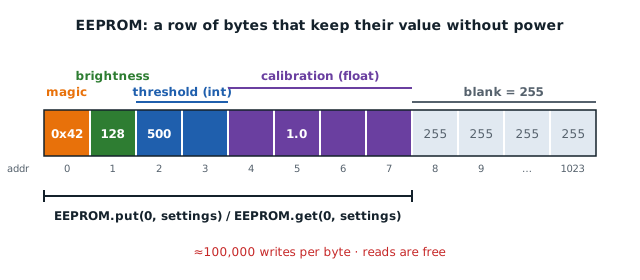
Real projects store several values. Put them in a struct and save it in one go. A magic byte tells you whether the EEPROM holds valid settings or is blank (or left over from a different sketch):
#include <EEPROM.h>

struct Settings {
  uint8_t magic;        // marks valid data
  uint8_t brightness;   // 0-255
  int     threshold;    // e.g. a sensor trigger level
  float   calibration;  // e.g. a load-cell factor
};

const uint8_t MAGIC = 0x42;   // change this when you change the struct
const int SETTINGS_ADDR = 0;
Settings settings;

void loadSettings() {
  EEPROM.get(SETTINGS_ADDR, settings);
  if (settings.magic != MAGIC) {          // blank or old data: use defaults
    settings = {MAGIC, 128, 500, 1.0};
    EEPROM.put(SETTINGS_ADDR, settings);
  }
}

void saveSettings() {
  EEPROM.put(SETTINGS_ADDR, settings);    // only changed bytes are written
}

void setup() {
  Serial.begin(9600);
  loadSettings();
  Serial.print("Brightness: "); Serial.println(settings.brightness);
  Serial.print("Threshold: ");  Serial.println(settings.threshold);
  Serial.print("Calibration: "); Serial.println(settings.calibration, 3);
}

void loop() {
  // Example: type a new threshold in the Serial Monitor to save it
  if (Serial.available()) {
    int t = Serial.parseInt();
    if (t > 0) {
      settings.threshold = t;
      saveSettings();
      Serial.print("Saved threshold "); Serial.println(t);
    }
  }
}
If you add or reorder fields later, change the magic number so old data isn't misread as the new layout.
Don't wear it out
Each EEPROM byte survives about 100,000 write cycles. That sounds like a lot until you write in loop():
- Writing every second wears a byte out in about 28 hours.
- Writing once per user change (a button press, a new calibration) lasts essentially forever.
Rules of thumb:
1. Never write unconditionally in loop(). Write only when a value actually changes.
2. Use update() or put(), which skip bytes that are already correct.
3. For a value that changes constantly (a knob being turned), wait until it has been stable for a few seconds before saving. A millis() timer is perfect for this.
4. Reading is free: reads don't wear the memory.
Saving when power is lost
The Arduino can't easily tell when power is about to disappear, so save when the value changes, not "at shutdown". A single write takes about 3.3 ms on an ATmega328P; a 10-byte struct takes around 33 ms if every byte changes.
ESP32 and ESP8266
These boards have no true EEPROM. The EEPROM library emulates it in flash, and you must call EEPROM.begin(size) in setup() and EEPROM.commit() after writing, or nothing is saved. On the ESP32 the Preferences library is the better choice: it stores values by name and handles wear for you.
Troubleshooting
- Values read as 255 or -1: nothing has been written there yet, or you're reading the wrong address.
- Float reads as "nan" or a huge number: the bytes are blank (all 0xFF). Use the magic-byte check.
- Settings look scrambled after changing code: the struct layout changed. Change the magic number.
- Two variables overwrite each other: their addresses overlap. Use
sizeof()to place the next one:EEPROM.put(sizeof(Settings), otherValue);.
— TheSolderBench · found a mistake? tell me