Log #82 · Oct 26, 2026
How to Use a 16x2 LCD with I2C on Arduino
Wire a 16x2 character LCD with an I2C backpack using only four wires, find its address, adjust the contrast, print text and numbers, and make custom characters. Code and fixes for a blank screen.
The 16x2 LCD is the classic Arduino display: two lines of 16 characters, a green or blue backlight, and very easy to read from across a room. On its own it needs six or more wires, but almost every one sold today comes with a small I²C backpack soldered on the back, which cuts the wiring down to four wires. This guide covers that version.
What you need
- A 16x2 LCD with an I²C backpack (a small board with a blue trimmer and a PCF8574 chip)
- An Arduino Uno or Nano
- Four jumper wires
Wiring
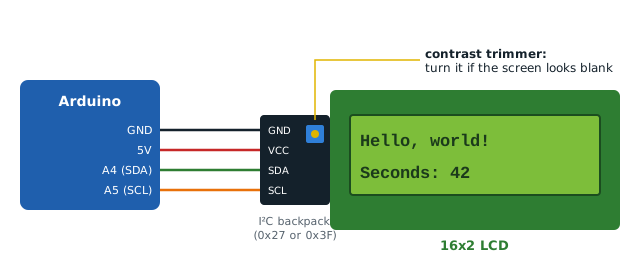
| Backpack pin | Arduino Uno / Nano |
|---|---|
| GND | GND |
| VCC | 5 V |
| SDA | A4 |
| SCL | A5 |
On a Mega use pins 20 (SDA) and 21 (SCL). The display is a 5 V part; most of them work poorly or not at all at 3.3 V.
Step 1: find the I²C address
Backpacks come with address 0x27 or 0x3F depending on the chip version. Rather than guess, run the I²C scanner from the I²C guide once and note the address it prints.
Step 2: install the library
In the Library Manager, search LiquidCrystal I2C and install the one by Frank de Brabander. (Several forks exist with slightly different function names; if yours uses lcd.begin() instead of lcd.init(), that's the only change.)
Step 3: Hello world
#include <Wire.h>
#include <LiquidCrystal_I2C.h>

LiquidCrystal_I2C lcd(0x27, 16, 2);   // address, columns, rows

void setup() {
  lcd.init();
  lcd.backlight();
  lcd.setCursor(0, 0);                // column 0, row 0
  lcd.print("Hello, world!");
}

void loop() {
  lcd.setCursor(0, 1);                // column 0, row 1
  lcd.print("Seconds: ");
  lcd.print(millis() / 1000);
  delay(200);
}
Change 0x27 to the address your scanner found.
Step 4: adjust the contrast
If the backlight is on but you see nothing, or only a row of solid blocks, the sketch is probably fine: the contrast is wrong. Turn the small blue trimmer on the backpack slowly with a screwdriver while the sketch runs until the characters appear. This is the number one beginner problem with these displays.
Printing numbers without leftovers
The LCD keeps whatever was written until you overwrite it. If a number goes from 100 to 99, you'll see "990" because the old last digit is still there. Two fixes:
// Option 1: pad with spaces after the number
lcd.setCursor(9, 1);
lcd.print(value);
lcd.print("   ");          // clears leftover digits

// Option 2: format to a fixed width
char buf[17];
snprintf(buf, sizeof(buf), "Temp: %3d C", temp);
lcd.setCursor(0, 1);
lcd.print(buf);
Avoid calling lcd.clear() in every loop: it's slow and makes the display flicker.
snprintf() on the Uno doesn't support %f for floats. To print a float, use lcd.print(value, 1) for one decimal place.
Custom characters
Each character cell is a 5×8 dot grid, and you can define up to 8 custom characters:
#include <Wire.h>
#include <LiquidCrystal_I2C.h>

LiquidCrystal_I2C lcd(0x27, 16, 2);

byte heart[8] = {
  0b00000,
  0b01010,
  0b11111,
  0b11111,
  0b01110,
  0b00100,
  0b00000,
  0b00000
};

void setup() {
  lcd.init();
  lcd.backlight();
  lcd.createChar(0, heart);   // store as character 0
  lcd.setCursor(0, 0);
  lcd.print("I ");
  lcd.write(byte(0));         // print character 0
  lcd.print(" Arduino");
}

void loop() {}
Degree symbols, battery icons and arrows are all just custom characters.
Useful functions
| Function | What it does |
|---|---|
lcd.clear() |
Clears the screen and moves the cursor home |
lcd.setCursor(col, row) |
Moves to a position (both start at 0) |
lcd.backlight() / lcd.noBacklight() |
Backlight on or off |
lcd.scrollDisplayLeft() |
Shifts all text one position left |
lcd.blink() / lcd.noBlink() |
Blinking block cursor |
LCD or OLED?
| 16x2 LCD | 0.96" OLED | |
|---|---|---|
| Size | big, easy to read at a distance | small, sharp |
| Graphics | text and 8 custom characters | full graphics |
| Current | 20–30 mA with backlight | around 10–20 mA |
| Daylight | very readable | can wash out |
For graphics and icons, see the OLED digital thermometer. For big, readable text, the LCD wins.
Project ideas
- Show a potentiometer reading as a bar graph using custom characters.
- Display temperature and humidity from a DHT11 or DHT22.
- A menu driven by a rotary encoder.
Troubleshooting
- Backlight on, no text: adjust the contrast trimmer.
- Row of solid blocks: contrast too high, or the address in the code is wrong so
init()never reached the display. - Nothing at all, not even backlight: check VCC/GND and the backlight jumper on the backpack (it must be fitted).
- Garbled characters: loose SDA/SCL wire or long wires. Keep them short.
- Compile errors: you installed a different fork; check its examples for
init()vsbegin().
— TheSolderBench · found a mistake? tell me