Log #90 · Nov 2, 2026
Arduino Upload Errors: How to Fix 'not in sync' and Port Problems
A step-by-step checklist for the most common Arduino upload errors, from a missing COM port and CH340 drivers to avrdude "not in sync" and "programmer is not responding", with the cause behind each fix.
You click Upload, the progress bar crawls, and the bottom of the Arduino IDE turns orange with something like avrdude: stk500_recv(): programmer is not responding or not in sync: resp=0x00. It's the most common wall beginners hit, and it almost never means the board is broken. This guide walks through the checks in the order that fixes the most boards fastest, and explains what each error message actually means.
What happens during an upload
When you press Upload, the IDE compiles your sketch, then calls a program named avrdude that talks to the bootloader, a small program already on the board's chip. The upload goes like this:
- The IDE opens the serial port. On an Uno or Nano this briefly pulls the reset line, restarting the chip.
- For about a second after reset, the bootloader listens on pins 0 (RX) and 1 (TX) for a program.
- avrdude sends the sketch, the bootloader writes it to flash memory, and your sketch starts.
If any step fails, avrdude reports that the "programmer" (the bootloader) isn't answering. So the real question is always: why can't the computer talk to the bootloader?
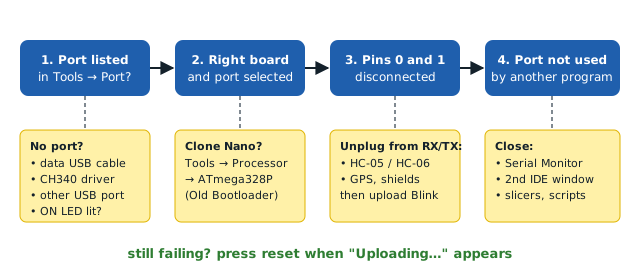
Step 1: Does the port appear at all?
Open Tools → Port with the board unplugged, then plug it in and open the menu again. A new entry should appear (COM3, COM4… on Windows, /dev/ttyUSB0 or /dev/ttyACM0 on Linux, /dev/cu.usbserial… on macOS).
No new port appears:
- Swap the USB cable. Many cables, especially ones that came with power banks or small gadgets, are charge-only and have no data wires. This is the single most common cause. Use a cable you know transfers files to a phone.
- Install the CH340 driver. Most clone Unos and Nanos use a CH340 USB chip instead of the original ATmega16U2. Windows 10/11 and recent macOS usually install it automatically, but not always. Search for the official "CH340 driver" from the chip maker, WCH, install it, then replug the board.
- Try another USB port, preferably directly on the computer instead of through a hub.
- Check the board gets power: the ON LED should light. If it doesn't, the cable or the USB socket is the problem.
Step 2: Right board, right port
With the port visible, check Tools → Board and Tools → Port again.
- Select the board you actually have: "Arduino Uno" for an Uno, "Arduino Nano" for a Nano.
- Nano only: many clone Nanos ship with the older bootloader. If uploading fails, go to Tools → Processor and choose ATmega328P (Old Bootloader). This fixes a large share of Nano upload errors, because the old bootloader listens at a different speed (57600 baud instead of 115200).
- If two ports appear and you aren't sure which one is the board, unplug it and see which one disappears.
Step 3: Free pins 0 and 1
The bootloader receives the sketch through pins 0 and 1. Anything connected there can block the upload:
- Bluetooth modules like the HC-05 or HC-06 wired to RX/TX are the classic culprit (see the Bluetooth robot car guide). Unplug the module's TX wire while uploading, or move it to other pins with SoftwareSerial.
- GPS modules, other Arduinos, or LEDs and buttons placed on pins 0 or 1.
- Shields that use those pins.
Simple test: disconnect everything from the board and upload the Blink example. If that works, the problem is in your wiring, not the board.
Step 4: Is something else using the port?
Only one program can open a serial port at a time. Close:
- A second Arduino IDE window or Serial Monitor connected to the same board.
- Serial plotters, Processing sketches, Python scripts or 3D-printer software (Cura, PrusaSlicer) that grabbed the port.
On Windows, "Access is denied" or "port busy" errors point straight to this.
Step 5: Reading the error messages
| Message | What it usually means | Try |
|---|---|---|
programmer is not responding / not in sync: resp=0x00 |
Bootloader never answered | Steps 2 and 3, Old Bootloader on Nano |
can't open device "COM3" / port busy |
Port missing or in use | Step 1 or Step 4 |
Board at COMx is not available |
Selected port no longer exists | Reselect the port after replugging |
sketch too big |
Program larger than flash | Remove unused libraries and debug Serial.print() lines, use smaller data types, or use a board with more flash |
Compilation error: exit status 1 |
Compile error, not an upload problem | Read the first red error line |
That last row matters: "exit status 1" alone tells you nothing (newer IDE versions also show it after a failed upload, so check whether it says compilation error). Scroll up and read the first error, which usually names the line with the typo.
Step 6: The manual reset trick
If auto-reset isn't working (a damaged reset capacitor, some clone boards), you can time the reset by hand:
- Click Upload.
- Watch the output panel. When "Compiling" finishes and the IDE shows "Uploading…", press and release the board's reset button.
- The bootloader starts right when avrdude starts talking. You may need two or three tries to get the timing right.
Step 7: When the bootloader is missing
If none of the above works on a known-good cable and port, and the board's L LED doesn't flash briefly after you press reset, the bootloader may be missing or corrupted. This happens with bare ATmega328P chips and occasionally with cheap clones. You can reinstall it with a second Arduino running the ArduinoISP example and Tools → Burn Bootloader. It takes ten minutes and revives most "dead" boards.
Prevention
- Keep one data cable labeled for your Arduino projects.
- Add an "unplug Bluetooth before uploading" note to projects that use pins 0 and 1, or avoid those pins entirely.
- Never connect more than 5 V to a pin; a board that truly stops responding after a wiring mistake may have a damaged USB chip or microcontroller.
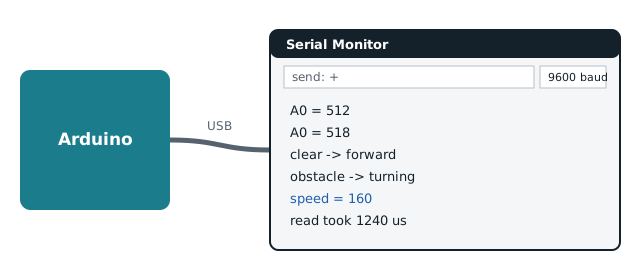
Once uploads work, check that the sketch runs with the Serial Monitor, and if you're still choosing hardware, see which Arduino to buy.
— TheSolderBench · found a mistake? tell me