Log #06 · Sep 27, 2026
Which Arduino Board Should You Buy First?
Uno, Nano, Mega, Leonardo or an ESP32? A practical comparison of pins, voltage and price, and a clear recommendation for your first board.
Walk into any electronics shop or online store and you will find a dozen boards with "Arduino" in the name, plus hundreds of compatible clones. They all run the same kind of code, but they differ in size, number of pins, logic voltage and extra features like Wi-Fi. This guide compares the boards beginners actually consider and ends with a straight answer.
What all Arduino boards share
Every board in this list is a small computer called a microcontroller mounted on a circuit board with:
- Digital pins that read or output on/off signals
- Analog input pins that measure voltages
- A USB connection for uploading code and printing messages
- A voltage regulator so it can run from batteries or a wall adapter
You write programs, called sketches, in the free Arduino IDE using a simplified version of C++. The same blink sketch runs on all of them with little or no change.
The main contenders
| Board | Chip | Logic voltage | Digital I/O | Analog in | Best for |
|---|---|---|---|---|---|
| Uno R3 | ATmega328P | 5 V | 14 | 6 | Learning, shields, tutorials |
| Uno R4 Minima / WiFi | Renesas RA4M1 | 5 V | 14 | 6 | Uno layout with a faster chip |
| Nano | ATmega328P | 5 V | 14 | 8 | Breadboards, small builds |
| Mega 2560 | ATmega2560 | 5 V | 54 | 16 | Projects with many sensors or motors |
| Leonardo / Micro | ATmega32U4 | 5 V | 20 | 12 | Acting as a USB keyboard or mouse |
| ESP32 dev board | ESP32 | 3.3 V | about 25 usable | up to 18 | Wi-Fi and Bluetooth projects |
Arduino Uno
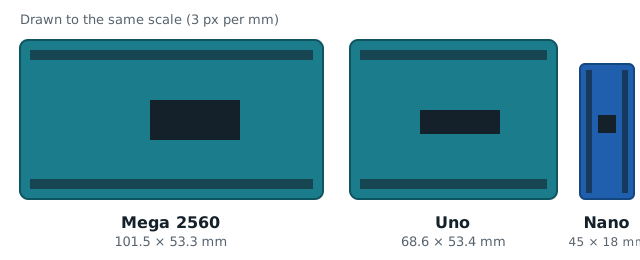
The Uno is the reference board. Almost every tutorial, book and course assumes you have one, and shields (add-on boards for motors, displays and more) plug directly on top. Its 5 V logic is forgiving and works with most beginner sensors. The main downside is size: it does not fit on a breadboard, so you connect it with jumper wires.
Arduino Nano
The Nano has the same chip as the classic Uno in a stick-shaped board that plugs straight into a breadboard. It is cheap, especially as a clone, and perfect once you start building compact projects like the obstacle-avoiding robot. Clones often use a CH340 USB chip that may need a driver on older Windows versions.
Arduino Mega 2560
The Mega has 54 digital pins and 16 analog inputs. You need it when a project has many inputs and outputs, such as a robot arm with six servos, a keypad and a display. For a first board, it is more than you need.
ESP32
Strictly speaking the ESP32 is not an Arduino, but it can be programmed from the Arduino IDE. It has Wi-Fi, Bluetooth and a much faster processor at a similar price to a Nano clone. Two things to keep in mind: its pins work at 3.3 V, so 5 V sensors can damage it, and some pins have special roles at boot. It is an excellent second board.
Genuine or clone?
Arduino is open hardware, so other manufacturers are allowed to make compatible boards. Clones cost less and usually work well. Genuine boards support the Arduino project and tend to have better quality control. For a first board either choice is fine; buy from a seller with good reviews.
What else to buy with it
A board alone cannot do much. A starter set should include:
- A solderless breadboard and jumper wires
- LEDs and a handful of resistors (220 Ω, 1 kΩ and 10 kΩ cover most tutorials)
- A few push buttons and a potentiometer
- A USB cable that matches the board (USB-B for Uno R3, USB-C for Uno R4 and many newer clones)
Many "starter kits" bundle all this plus sensors and a servo. They are usually good value for a first purchase. Later, add the basics from our bench tools list.
The recommendation
Buy an Arduino Uno (R3 or R4) or a starter kit built around one. It matches nearly every tutorial, it tolerates beginner mistakes better than 3.3 V boards, and shields make wiring motors and displays easy. Once you are comfortable, add a couple of Nano boards for permanent builds and an ESP32 when you want Wi-Fi.
Your first hour with the board
- Install the Arduino IDE from the official Arduino website.
- Connect the board by USB and select it under Tools → Board.
- Pick the right port under Tools → Port.
- Upload the built-in Blink example.
That last step is covered line by line in your first Arduino sketch. When you move beyond USB power, read how to power an Arduino project before connecting batteries.
— TheSolderBench · found a mistake? tell me