Log #33 · Sep 27, 2026
Essential Tools for an Electronics Bench
A practical, budget-aware list of the tools and supplies you actually need to build Arduino and robotics projects, in the order to buy them.
You do not need a professional lab to build electronics. A small desk, a handful of tools and a bit of organization will take you from blinking LEDs to complete robots. The trick is buying the right things in the right order, so you are not stuck waiting for a part or wasting money on gadgets you never use. This list is organized in stages, starting with what you need on day one.
Stage 1: the first week
These are enough for breadboard projects and everything in our Arduino and sensor guides.
- An Arduino board or starter kit. See which Arduino to buy. A kit with LEDs, resistors, buttons and a few sensors saves a lot of separate orders.
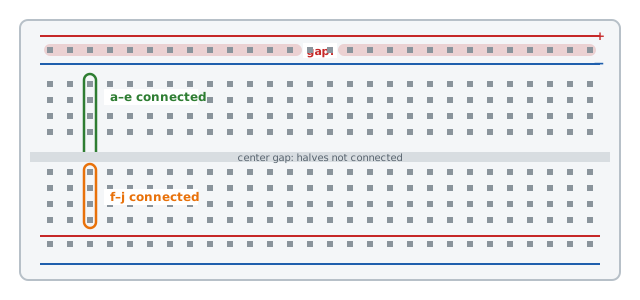
- Solderless breadboards. One full-size (830 points) and one half-size.
- Jumper wires. Male-to-male for breadboards, plus male-to-female for modules with header pins.
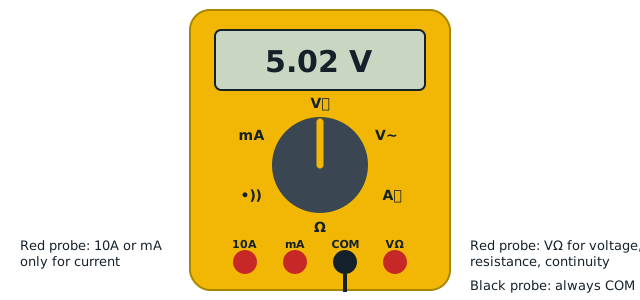
- A basic multimeter. Autoranging with a continuity beep. It is your eyes inside the circuit; read how to use a multimeter.
- A resistor assortment. Values from 100 Ω to 1 MΩ, including plenty of 220 Ω, 1 kΩ and 10 kΩ.
Stage 2: making things permanent
When you are ready to move off the breadboard:
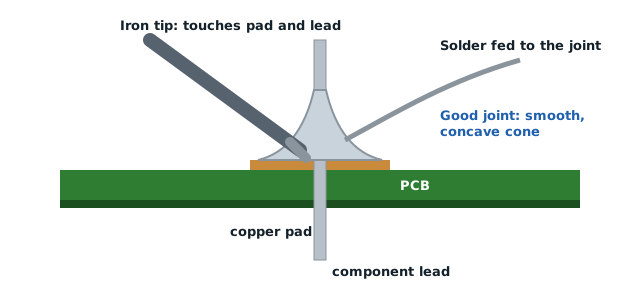
- Temperature-controlled soldering iron. The most important upgrade. A fixed-temperature iron makes learning frustrating.
- Solder, 0.6–0.8 mm with flux core.
- Brass tip cleaner and a flux pen.
- Flush cutters for trimming leads cleanly.
- Wire strippers sized for 22–30 AWG wire.
- Helping hands or a small PCB vise.
- Solder wick and a desoldering pump for fixing mistakes.
- Perfboard or stripboard, plus header pins and sockets so modules can be unplugged.
- Safety glasses.
The soldering guide explains how to use each of these.
Stage 3: working with motors and power
- A bench power supply or a quality adjustable USB-C power module. Being able to set a voltage and a current limit protects your circuits during first power-up. A current limit of, say, 200 mA turns a short circuit into a harmless reading instead of smoke.
- Battery holders with switches, and a charger matched to your battery chemistry. See our battery comparison.
- Small screwdrivers, both flat and Phillips, including precision sizes for terminal blocks.
- Needle-nose pliers.
- Heat-shrink tubing and a heat source, or a lighter used carefully.
- Zip ties and double-sided foam tape for mounting parts on chassis.
Stage 4: nice to have
These make life easier but are not needed to start:
- Silicone work mat: heat-resistant, with compartments for screws.
- Magnifier or clip-on lamp with magnifying lens for inspecting joints.
- Fume extractor fan.
- Hot glue gun for strain relief and quick mounting.
- Logic analyzer: an inexpensive 8-channel USB analyzer helps debug I2C, SPI and serial signals.
- A cheap oscilloscope once you work with PWM, audio or fast signals.
- Crimping tool for JST and Dupont connectors.
Organizing parts
A tidy bench is a fast bench. Small parts vanish quickly and look alike.
- Use a drawer cabinet or divided boxes with one value or part type per compartment.
- Label everything. Write resistor values on the drawer, not just the color bands; see resistor color codes if you need to identify loose ones.
- Keep modules like sensors and drivers in anti-static bags with a label.
- Keep a parts log: a simple spreadsheet of what you have and where. It stops you buying the same sensor three times.
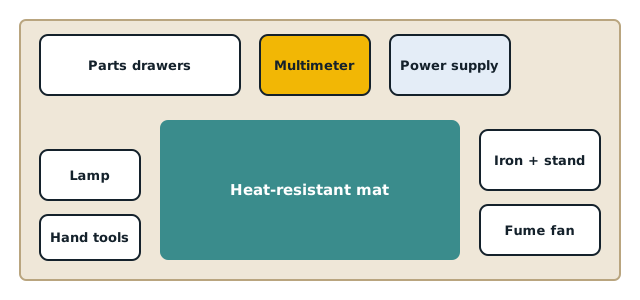
Setting up the space
- Lighting: a bright, neutral-white lamp. Color bands and small joints are hard to read under warm light.
- Surface: a heat-resistant mat under the soldering area.
- Power: a power strip with a switch, placed where you can reach it quickly.
- Ventilation: an open window or small fan for solder fumes.
- Anti-static: touch a grounded metal object before handling sensitive boards, especially in dry climates.
What to skip at first
Skip large all-in-one "rework stations", expensive oscilloscopes and giant component kits with hundreds of parts you will not use. Buy parts for specific projects, like the obstacle-avoiding robot, and your collection will grow around what you actually build.
— TheSolderBench · found a mistake? tell me