Log #44 · Oct 3, 2026
Brushless Motors and ESCs Explained
How brushless DC motors work, what KV ratings mean, why you need an ESC, and how to arm and control one safely from an Arduino with the Servo library.
Drones, RC planes, electric skateboards and many power tools all use brushless DC motors. They are lighter, more efficient and far more powerful for their size than the brushed motors in most robot kits. The catch is that you cannot simply connect one to a battery: it needs an electronic speed controller (ESC). This guide explains how brushless motors work, how to read their specs, and how to drive one from an Arduino without getting hurt.
Brushed vs brushless
A regular DC motor has permanent magnets on the outside and coils on the spinning part. Small carbon brushes rub against a segmented ring (the commutator) to switch the current in the coils as the shaft turns. That switching keeps the motor turning, but the brushes spark, wear out and waste energy.
A brushless motor turns this inside out. The coils are fixed and the magnets spin. Because nothing touches, there is no wear and little friction. But something now has to switch the current between coils at exactly the right moment. That is the ESC's job.
| Brushed DC | Brushless (BLDC) | |
|---|---|---|
| Wires | 2 | 3 |
| Drive | Battery or H-bridge | ESC required |
| Efficiency | 60–80 % | 80–95 % |
| Wear | Brushes wear out | Only bearings |
| Low-speed control | Easy | Harder (sensorless) |
| Cost | Cheap | Motor + ESC cost more |
How the motor turns
A typical hobby brushless motor has three groups of coils (phases), wired to its three wires. The ESC energizes two phases at a time in a six-step sequence. Each step creates a magnetic field slightly ahead of the rotor magnets, and the rotor turns to follow it. Step quickly through the sequence and the field rotates; the rotor chases it.
To switch at the right moment, the ESC must know where the rotor is. Sensored motors include Hall sensors for this (like the ones in our Hall effect guide). Most hobby motors are sensorless: the ESC watches the voltage induced in the unpowered phase (back-EMF) to work out the rotor position. Back-EMF only appears once the motor is moving, which is why sensorless motors stutter or cog at very low speeds.
Reading the specs
Size code, for example 2212 or 2306: the first two digits are the stator diameter in mm, the last two its height. Bigger stators give more torque.
KV rating: how many RPM the motor spins per volt with no load. A 1000 KV motor on a 3S LiPo (11.1 V nominal) spins at roughly 11,000 RPM unloaded.
- High KV (2000 KV and up): fast, low torque, small propellers. Racing drones.
- Low KV (300–900 KV): slower, more torque, big propellers or direct-drive wheels.
KV is not power. A low-KV motor is not weaker; it simply trades speed for torque at the same voltage.
Maximum current and cell count (for example "2–4S") tell you which ESC and battery to pair it with.
Choosing an ESC
Match three things:
- Current rating at least 20–30 % above the motor's maximum current. A 30 A motor wants a 40 A ESC.
- Voltage that covers your battery: "2–4S" means 2 to 4 LiPo cells.
- BEC (battery eliminator circuit): many ESCs output a regulated 5 V on the signal cable's red wire, meant to power a receiver. You can power a small Arduino from it, but never connect it to the Arduino's 5 V pin and USB at the same time.
Controlling an ESC from Arduino
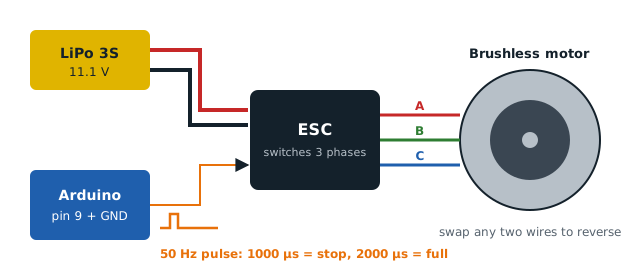
Most hobby ESCs accept the same signal as a servo: a pulse every 20 ms (50 Hz) whose width sets the throttle. 1000 µs means stop, 2000 µs means full throttle. The Servo library generates exactly that.
Wiring:
- ESC thick red and black → battery (through a switch or connector you can pull quickly)
- ESC three motor wires → motor (any order; swap two to reverse direction)
- ESC signal (white or yellow) → Arduino pin 9
- ESC signal ground (black or brown) → Arduino GND (the grounds must be shared)
- ESC signal red (BEC 5 V) → leave unconnected if the Arduino is on USB
#include <Servo.h>

Servo esc;
const int ESC_PIN = 9;

void setup() {
  Serial.begin(9600);
  esc.attach(ESC_PIN, 1000, 2000);
  esc.writeMicroseconds(1000);   // zero throttle so the ESC can arm
  Serial.println("Connect the battery now, wait for the beeps...");
  delay(5000);
  Serial.println("Armed. Send 0-100 for throttle %.");
}

void loop() {
  if (Serial.available()) {
    int pct = constrain(Serial.parseInt(), 0, 100);
    int us = map(pct, 0, 100, 1000, 2000);
    esc.writeMicroseconds(us);
    Serial.print("Throttle "); Serial.print(pct); Serial.println(" %");
  }
}
Set the Serial Monitor line ending to "Newline", type 10 and the motor should spin slowly. Type 0 to stop.
Arming and calibration
ESCs refuse to start until they see a zero-throttle signal after power-up. That arming step prevents a motor from spinning the instant you plug in a battery. You will hear a series of beeps: usually one per battery cell, then a longer tone when armed.
If the motor does not start until high throttle, or never reaches full speed, calibrate the throttle range: send 2000 µs, connect the battery, wait for the beeps, then send 1000 µs. The exact beep sequence varies by brand, so check your ESC's manual.
Safety
Brushless motors are strong enough to cause real injuries.
- Remove propellers whenever you test code. Always.
- Clamp the motor down; it will jump off the bench at high throttle.
- Start at low throttle percentages and increase slowly.
- Use a battery connector you can unplug quickly, and never leave a LiPo charging or running unattended.
Where brushless motors fit in your projects
For small, slow robots, brushed gear motors with an H-bridge driver remain simpler and cheaper. Reach for brushless when you need high power for little weight: propellers, fans, fast wheels, or gimbals (which use special low-KV gimbal motors driven slowly by dedicated controllers).
— TheSolderBench · found a mistake? tell me