Log #56 · Oct 8, 2026
Build an Arduino Weather Station with a BME280 and OLED
A compact indoor weather station that shows temperature, humidity, pressure and a simple forecast trend on an OLED, with parts list, I2C wiring and full Arduino code.
This project turns a BME280 sensor and a small OLED screen into a desk weather station that shows temperature, humidity and air pressure, plus an arrow that tells you whether the pressure is rising or falling (a rough hint about the weather to come). Both parts use the same two-wire I²C bus, so the wiring takes five minutes. It is a natural next step after the OLED digital thermometer.
Parts list
| Part | Notes |
|---|---|
| Arduino Uno or Nano | Any 5 V or 3.3 V Arduino works |
| BME280 breakout | Temperature, humidity and pressure. Get a module with a voltage regulator if you use 5 V |
| 0.96" SSD1306 OLED, I²C, 128×64 | The four-pin version (GND, VCC, SCL, SDA) |
| Breadboard and jumper wires |
BME280 or BMP280?
The two chips look identical and are often mislabeled. The BMP280 measures only temperature and pressure; the BME280 adds humidity. The BME280 library checks the chip ID when it starts, so if your module is really a BMP280 the sketch below reports "not found" even though the wiring is fine. In that case, use the Adafruit BMP280 library instead and drop the humidity line.
Wiring
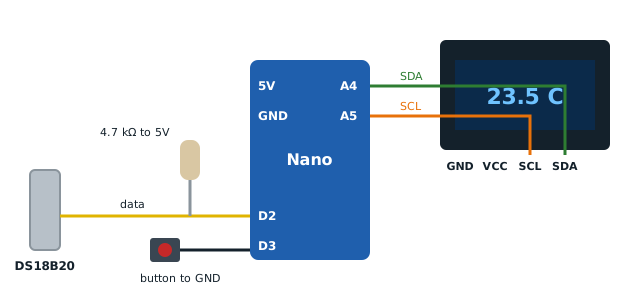
Both modules connect to the same I²C pins, in parallel:
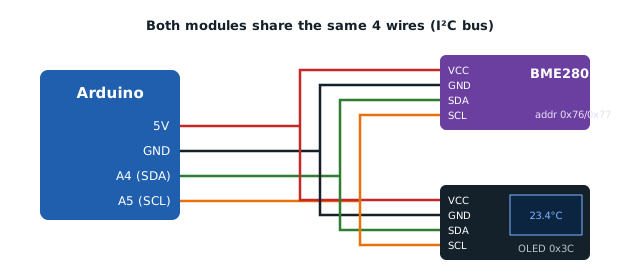
| Module pin | Arduino Uno / Nano |
|---|---|
| VCC (both) | 5 V (or 3.3 V for bare 3.3 V modules) |
| GND (both) | GND |
| SDA (both) | A4 |
| SCL (both) | A5 |
On boards like the Uno R3 you can also use the separate SDA and SCL pins near AREF; they are the same signals. Most breakouts include the I²C pull-up resistors, so you don't need to add them. (If you're curious why I²C needs them, see pull-up and pull-down resistors explained.)
I²C addresses
- BME280: 0x76 or 0x77, depending on how the SDO pin is wired on the module. Many cheap modules use 0x76.
- OLED: usually 0x3C (sometimes 0x3D).
If nothing shows up, run an I²C scanner sketch (File → Examples → Wire → i2c_scanner in some IDE versions, or any scanner from the library manager examples) to see the real addresses.
Libraries
Install from the Library Manager (Sketch → Include Library → Manage Libraries):
- Adafruit BME280 Library (it also installs Adafruit Unified Sensor)
- Adafruit SSD1306 and Adafruit GFX Library
The code
#include <Wire.h>
#include <Adafruit_GFX.h>
#include <Adafruit_SSD1306.h>
#include <Adafruit_BME280.h>

Adafruit_SSD1306 display(128, 64, &Wire, -1);
Adafruit_BME280 bme;

const unsigned long READ_MS  = 2000;          // refresh every 2 s
const unsigned long TREND_MS = 30UL * 60000;  // compare pressure over 30 min
unsigned long lastRead = 0, lastTrend = 0;
float refPressure = 0;
int trend = 0;                                 // -1 falling, 0 steady, 1 rising

void setup() {
  Serial.begin(9600);
  if (!display.begin(SSD1306_SWITCHCAPVCC, 0x3C)) {
    Serial.println("OLED not found");
    while (true) {}
  }
  if (!bme.begin(0x76) && !bme.begin(0x77)) {
    Serial.println("BME280 not found - check wiring and address");
    while (true) {}
  }
  refPressure = bme.readPressure() / 100.0;
  lastTrend = millis();
}

void loop() {
  if (millis() - lastRead < READ_MS) return;
  lastRead = millis();

  float t = bme.readTemperature();             // °C
  float h = bme.readHumidity();                // %
  float p = bme.readPressure() / 100.0;        // Pa -> hPa

  if (millis() - lastTrend > TREND_MS) {
    float diff = p - refPressure;
    trend = (diff > 0.5) ? 1 : (diff < -0.5) ? -1 : 0;
    refPressure = p;
    lastTrend = millis();
  }

  display.clearDisplay();
  display.setTextColor(SSD1306_WHITE);

  display.setTextSize(2);
  display.setCursor(0, 0);
  display.print(t, 1);
  display.print((char)247);                    // degree symbol
  display.print("C");

  display.setTextSize(1);
  display.setCursor(0, 24);
  display.print("Humidity: ");
  display.print(h, 0);
  display.print(" %");

  display.setCursor(0, 38);
  display.print("Pressure: ");
  display.print(p, 1);
  display.print(" hPa");

  display.setCursor(0, 52);
  display.print("Trend: ");
  display.print(trend > 0 ? "rising /" : trend < 0 ? "falling \\" : "steady -");

  display.display();
}
The sketch uses millis() instead of delay(), so you can easily add buttons or logging later.
Understanding the readings
- Temperature reads a little high if the sensor sits near the Arduino or the OLED, which warm up. Mount the BME280 a few centimeters away on wires, or in free air.
- Humidity is relative humidity: 40–60 % indoors is comfortable.
- Pressure at sea level is about 1013 hPa and drops roughly 1 hPa for every 8 m you go up, so your value depends on your altitude. That is why the trend is more useful than the number itself: pressure falling by more than about 1 hPa over a few hours often means unsettled weather is coming, while rising pressure usually means it is clearing.
The trend here compares readings 30 minutes apart, which is quick enough to see changes the same day. A real barometer uses three hours; change TREND_MS if you want that.
Troubleshooting
- "BME280 not found": check SDA/SCL aren't swapped, and run an I²C scanner. If the scanner finds a device at 0x76 or 0x77 but the sketch still fails, the module is probably a BMP280 (no humidity).
- OLED blank: try address 0x3D in
display.begin(). - Temperature drifting up over time: the sensor is heating itself or sitting near warm parts. Move it, or use
bme.setSampling()in forced mode to measure less often.
Ideas to extend it
- Log readings to the Serial Monitor and plot them with the Serial Plotter.
- Add a button to cycle between screens: current values, today's min/max, and the 3-hour pressure trend.
- Compare it with the sensors in temperature sensors compared to see how they differ side by side.
— TheSolderBench · found a mistake? tell me