Log #103 · Nov 9, 2026
Bench Power Supply Basics: Voltage and Current Limit Explained
How a lab bench power supply works, what CV and CC mode mean, how to set the current limit before connecting a circuit, linear vs switching supplies, the green earth terminal, and how to choose one for a hobby bench.
A wall adapter gives one voltage and as much current as the circuit asks for, until something burns. A bench power supply gives any voltage you dial in, shows exactly how much current your circuit draws, and, most importantly, limits the current so a wiring mistake heats nothing but your pride. It's the tool that saves the most components on a beginner's bench. This guide explains how to use one properly.
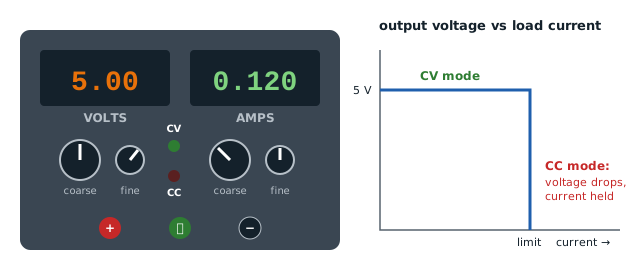
The two knobs
Every adjustable bench supply has at least two controls:
- Voltage (V): the voltage the supply tries to keep at its output.
- Current (A), the current limit: the most current the supply will deliver; if the circuit tries to draw more, the supply lowers the voltage instead.
Many supplies split each control into coarse and fine knobs. The displays show the actual output voltage and the actual current being drawn, which makes the supply a handy current meter too.
CV and CC: the two modes
The supply is always in one of two modes, shown by two small indicators:
- CV (constant voltage): the circuit draws less than the current limit. The supply holds the voltage you set; the current is whatever the circuit needs. This is normal operation.
- CC (constant current): the circuit tries to draw more than the limit. The supply lowers the voltage just enough to keep the current at the limit.
If the CC light comes on unexpectedly, your circuit is drawing more than you thought: a short circuit, a reversed part, a stalled motor or an LED without a resistor. The supply has just protected it.
Setting it up safely: the routine
Do this before connecting your circuit:
- Turn the output off (if the supply has an Output button) or disconnect the leads.
- Set the voltage, for example 5.00 V for an Arduino project.
- Set the current limit: turn the current knob fully down, short the red and black leads together (on the supply's own terminals, never on your circuit), turn on the output, and turn the current knob up until the display shows the limit you want, for example 0.200 A. The supply is in CC mode while the leads are shorted.
- Turn the output off, remove the short, and check that the voltage display reads what you set.
- Connect your circuit, red to +, black to −, and turn the output on.
- Watch the current display. If it reads far above what you expected, or CC lights up, turn off and investigate.
Some supplies have a "limit set" or "display set" button that shows the settings without shorting the leads; use it if yours does.
Choosing the current limit
Set it a little above what the circuit should draw:
| Circuit | Reasonable limit |
|---|---|
| A few LEDs or a sensor module | 50–100 mA |
| Arduino with a few modules | 200–300 mA |
| Small servo or gear motor | 0.5–1 A |
| Testing a brand-new board for the first time | As low as possible: 50 mA, then raise it |
For motors, remember that the start-up current is several times the running current. If the limit is too low, the motor won't start and CC lights up; raise it gradually.
Typical uses on a hobby bench
- First power-up of a new circuit with a low current limit, so a solder bridge or reversed chip can't burn anything.
- Measuring how much current a project draws, to size batteries or adapters. See how long will a battery run my Arduino.
- Simulating a battery as it discharges: lower the voltage step by step and see when your project stops working.
- Testing motors at different voltages before choosing a driver.
- Checking an LED's forward voltage: set the current limit to 10–20 mA and raise the voltage until the LED lights; the CC mode protects it.
Linear vs switching supplies
| Linear | Switching | |
|---|---|---|
| Output noise (ripple) | Very low | Higher (small spikes) |
| Weight | Heavy (big transformer) | Light |
| Efficiency, heat | Low, runs warm | High, runs cool |
| Price for the same power | Higher | Lower |
| Best for | Audio, sensitive analog circuits | General hobby use, motors |
For Arduino, sensors, motors and LEDs, a good switching supply of 30 V, 5 A (or 30 V, 3 A) is the common choice. Choose one with an output on/off button and three or four digits on the current display (0.001 A or 0.01 A resolution).
The three terminals
Many supplies have three output terminals:
- Red (+) and black (−): the output.
- Green (earth / ⏚): connected to the mains earth through the power cord, not to the output. The output is "floating" relative to earth.
For most projects you leave the green terminal unused. It's there for when you want to tie your circuit's ground to earth, for example to reduce noise when measuring with an oscilloscope, whose probe ground is also earthed.
Mistakes to avoid
- Turning the voltage up while connected. Set it first, then connect. Some supplies briefly overshoot when the output switches on; turning the output on before connecting avoids that.
- Thin, long alligator leads at high current. At 3 A, a cheap 1 m lead can drop half a volt. Use short, thick leads with banana plugs, and measure the voltage at the circuit with a multimeter.
- Connecting a battery to the supply's output. A charged battery can push current back into the supply. If you charge batteries from a bench supply, only do it with the correct voltage and current set, with a diode or a charger module in between, and never unattended. For lithium cells, a dedicated charger is safer.
- Assuming the current limit protects everything. It limits the total current. With the limit at 1 A, up to 1 A can still flow into a small part connected straight across the output, which is enough to destroy a 20 mA LED. Set the limit for the most delicate part you're testing. Also, the supply's output capacitor can deliver a short burst of current into a short or a freshly connected part before the limit takes over.
Bench supply vs wall adapter
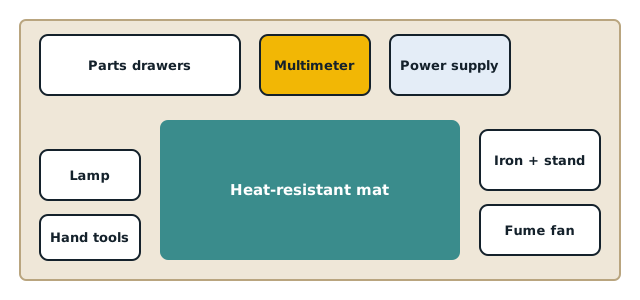
A fixed wall adapter is fine for a finished project. The bench supply is for building and testing: it shows the current, limits it and lets you change the voltage. Most makers use both. It sits next to the soldering iron and multimeter in the essential bench tools.
— TheSolderBench · found a mistake? tell me