Log #96 · Nov 2, 2026
Arduino Water Tank Level Monitor with HC-SR04 and LCD
Build a water tank level indicator with an HC-SR04 ultrasonic sensor, a 16x2 I2C LCD and a buzzer. Shows the level in percent and liters with a bar graph, filters bad readings and sounds a low-level alarm.
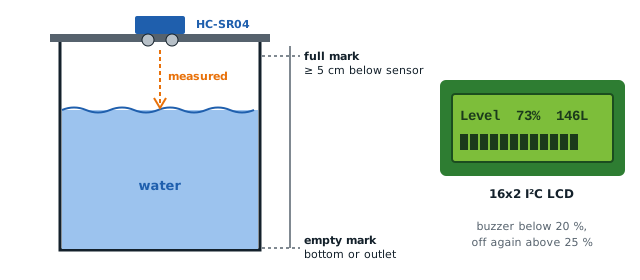
How much water is left in the tank on the roof? This project answers that without opening the lid. An ultrasonic sensor mounted at the top of the tank measures the distance down to the water surface, the Arduino turns that into a percentage and an estimate in liters, and a 16x2 LCD shows it with a bar graph. A buzzer warns you when the level drops below 20 %. It uses the same sensor as the parking sensor project, pointed down instead of forward.
Parts
| Part | Notes |
|---|---|
| Arduino Uno or Nano | |
| HC-SR04 ultrasonic sensor | See the HC-SR04 guide |
| 16x2 LCD with I²C backpack | Address 0x27 or 0x3F |
| Active buzzer | 5 V type, + to the pin |
| Jumper wires, a small enclosure | To protect the electronics from splashes |
How the measurement works
The HC-SR04 sends a burst of ultrasound and times how long the echo takes to come back. Sound travels about 343 m/s at 20 °C, so each centimeter of distance adds about 58 µs to the round trip.
Two distances from your own tank define everything:
- Empty distance: from the sensor to the tank bottom (or to the outlet pipe, if water below it can't be used).
- Full distance: from the sensor to the water surface when the tank is full.
The level in percent is then:
level % = (empty distance − measured distance) ÷ (empty distance − full distance) × 100
For a tank with straight sides (most cylindrical and rectangular tanks), liters are simply that percentage of the usable capacity.
Mounting the sensor
- Mount the sensor on the lid, facing straight down, over a clear area away from the inlet pipe, floats and walls. A tilted sensor reads the wall or misses the echo.
- Keep at least 5 cm between the sensor and the highest water level. The HC-SR04 can't measure closer than about 2–3 cm reliably, and splashes on the transducers ruin readings.
- The HC-SR04 is not waterproof. Humidity inside a closed tank can condense on it and corrode it over months. For a permanent installation in a humid tank, use a waterproof sensor with a sealed probe. The JSN-SR04T works with almost the same code (use a 20 µs trigger pulse instead of 10 µs), but it can't measure closer than about 25 cm, so mount it at least that far above the full level.
Wiring
| From | To |
|---|---|
| HC-SR04 VCC | 5V |
| HC-SR04 GND | GND |
| HC-SR04 TRIG | D9 |
| HC-SR04 ECHO | D10 |
| LCD backpack VCC / GND | 5V / GND |
| LCD SDA / SCL | A4 / A5 (Uno/Nano) |
| Buzzer + | D8 |
| Buzzer − | GND |
If the sensor is more than a meter or two from the Arduino, use a shielded or twisted cable for TRIG/ECHO and keep it away from mains wiring.
The code
You need the LiquidCrystal I2C library (by Frank de Brabander), installed from the Library Manager. If the screen stays blank, the 16x2 LCD guide explains the contrast trimmer and address scan.
#include <Wire.h>
#include <LiquidCrystal_I2C.h>

LiquidCrystal_I2C lcd(0x27, 16, 2);      // try 0x3F if the screen stays blank

const int TRIG = 9, ECHO = 10;
const int BUZZER = 8;

// ---- measure these on your own tank ----
const float FULL_CM = 8.0;               // sensor to water surface when full
const float EMPTY_CM = 108.0;            // sensor to bottom (or outlet) when empty
const float CAPACITY_L = 200.0;          // liters between empty and full
const int ALARM_ON = 20;                 // alarm below this %
const int ALARM_OFF = 25;                // and stays on until above this %

bool alarm = false;

float readCm() {
  digitalWrite(TRIG, LOW);
  delayMicroseconds(2);
  digitalWrite(TRIG, HIGH);
  delayMicroseconds(10);
  digitalWrite(TRIG, LOW);
  unsigned long us = pulseIn(ECHO, HIGH, 30000UL);   // ~5 m timeout
  if (us == 0) return -1;                            // no echo
  return us * 0.0343 / 2.0;
}

float medianCm() {                       // median of 5 readings, ignores misses
  float r[5];
  int n = 0;
  for (int i = 0; i < 5; i++) {
    float d = readCm();
    if (d > 0) r[n++] = d;
    delay(60);                           // let echoes die out
  }
  if (n == 0) return -1;
  for (int i = 1; i < n; i++) {          // insertion sort
    float k = r[i];
    int j = i - 1;
    while (j >= 0 && r[j] > k) { r[j + 1] = r[j]; j--; }
    r[j + 1] = k;
  }
  return r[n / 2];
}

void setup() {
  pinMode(TRIG, OUTPUT);
  pinMode(ECHO, INPUT);
  pinMode(BUZZER, OUTPUT);
  lcd.init();
  lcd.backlight();
  lcd.print("Tank monitor");
  delay(1000);
}

void loop() {
  float d = medianCm();

  if (d < 0) {
    lcd.clear();
    lcd.print("Sensor error");
    lcd.setCursor(0, 1);
    lcd.print("check wiring");
    digitalWrite(BUZZER, LOW);
    delay(1000);
    return;
  }

  float pct = (EMPTY_CM - d) / (EMPTY_CM - FULL_CM) * 100.0;
  int level = constrain((int)(pct + 0.5), 0, 100);
  int liters = (int)(CAPACITY_L * level / 100.0 + 0.5);

  char line[17];
  snprintf(line, sizeof(line), "Level %3d%% %4dL", level, liters);
  lcd.setCursor(0, 0);
  lcd.print(line);

  int blocks = (level * 16 + 50) / 100;  // 0..16 full blocks
  lcd.setCursor(0, 1);
  for (int i = 0; i < 16; i++) lcd.write(i < blocks ? 255 : ' ');  // bar, padded with spaces

  if (!alarm && level < ALARM_ON) alarm = true;
  if (alarm && level > ALARM_OFF) alarm = false;
  digitalWrite(BUZZER, alarm ? HIGH : LOW);

  delay(1000);
}
How the code works
readCm()triggers the sensor and converts the echo time to centimeters. A timeout returns −1 instead of a wrong number.medianCm()takes five readings and returns the middle one. One stray echo from a wall or a ripple can't throw the result off, which matters a lot over a moving water surface.- The percentage is clamped between 0 and 100, so small errors near full or empty don't show "103 %".
snprintfformats the top line to exactly 16 characters, so old digits are always overwritten without clearing the screen (which would make it flicker). (Arduino'ssnprintfdoesn't support%f, which is why the code converts to integers first.)- Character 255 in the LCD's built-in font is a solid block, so the second line becomes a 16-step bar graph without any custom characters. The rest of the line is filled with spaces, so the bar shrinks cleanly without clearing (and flickering) the screen.
- The alarm uses hysteresis: it turns on below 20 % and only turns off above 25 %. Without that gap, a level hovering around 20 % would make the buzzer chirp on and off.
Calibration
- With the tank empty (or at the lowest level you care about), read the distance on the Serial Monitor or measure with a tape: that's
EMPTY_CM. - With the tank full, do the same for
FULL_CM. - Set
CAPACITY_Lto the usable volume. For a cylinder: liters = 3.1416 × radius² × height ÷ 1000, with radius and height in centimeters (height =EMPTY_CM − FULL_CM). - If your tank narrows at the top or bottom (some plastic tanks do), the liter value is only an estimate; the percentage of height is still accurate.
Improvements
- Temperature compensation: sound is about 2 % faster at 30 °C than at 20 °C. In a hot rooftop tank, add a temperature sensor and use 331.3 + 0.606 × °C m/s for the speed of sound.
- Pump control: add a relay module to switch a pump on below 30 % and off at 95 %, using the same hysteresis idea.
- Battery power: measure once a minute and sleep in between; see how long will a battery run my Arduino.
Troubleshooting
- Reading jumps or shows 0 %/100 % at random: the sensor sees the tank wall, a pipe or a ladder. Move it toward the center, or mount it over a wide vertical pipe (10 cm or more) that reaches below the empty level and calms the surface. Narrow pipes cause echoes off the pipe wall.
- "Sensor error" constantly: check TRIG/ECHO aren't swapped and that the sensor has 5 V.
- Level reads high when the tank is nearly full: the water is inside the sensor's dead zone. Raise the sensor.
- LCD blank or shows blocks: adjust the contrast trimmer on the backpack or try address 0x3F.
— TheSolderBench · found a mistake? tell me