Log #15 · Sep 27, 2026
Light Sensors with Arduino: LDR vs BH1750
How photoresistors and the BH1750 digital light sensor work, how to wire and read each, and which one to choose for night lights, logging or measuring lux.
Measuring light lets a project react to its surroundings: a lamp that turns on at dusk, a display that dims in the dark, a greenhouse logger or a robot that follows a flashlight. Two sensors cover almost every hobby need. The LDR (light-dependent resistor) is cheap and simple, and the BH1750 is a small digital module that reports real light levels in lux. This guide explains both.
The LDR (photoresistor)
An LDR is a resistor whose value drops as light increases. A common part like the GL5528 measures roughly 10 to 20 kΩ in normal indoor light and around 1 MΩ in darkness, falling to a few hundred ohms in bright sunlight.
Wiring it as a voltage divider
The Arduino measures voltage, not resistance, so pair the LDR with a fixed resistor to form a voltage divider, as explained in the Ohm's law guide:
- LDR from 5 V to A0
- 10 kΩ resistor from A0 to GND
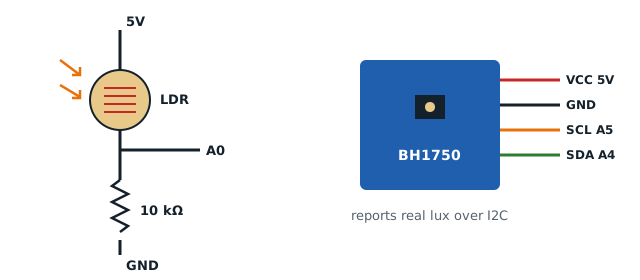
More light lowers the LDR's resistance, so the voltage at A0 rises. The 10 kΩ fixed resistor puts the most sensitive part of the range around typical room light. Use a larger value, like 100 kΩ, for dim environments.
Reading it
void loop() {
  int light = analogRead(A0);       // 0 = dark, 1023 = very bright
  Serial.println(light);
  delay(200);
}
A dusk-activated light with hysteresis
A naive "if dark, turn on" flickers at dusk, when the reading hovers around the threshold. Use two thresholds, a technique called hysteresis:
bool lampOn = false;

void loop() {
  int light = analogRead(A0);
  if (!lampOn && light < 300) lampOn = true;    // clearly dark
  if (lampOn && light > 400)  lampOn = false;   // clearly bright
  digitalWrite(7, lampOn);
  delay(200);
}
To switch a real lamp, drive a relay module from pin 7. And keep the sensor out of the lamp's own light, or it will switch itself off.
LDR limitations
- Readings are relative, not calibrated. Two LDRs give different numbers in the same light.
- They respond slowly, taking tens of milliseconds to settle after a change.
- Many older LDRs contain cadmium sulfide, which is restricted in some countries under environmental rules.
For "is it dark or bright?", an LDR is perfect.
The BH1750 digital light sensor
The BH1750 is a small chip, usually sold on a breakout board like the GY-302, that measures illuminance and reports it directly in lux, the standard unit of light. Its range is about 1 to 65 535 lux, and it communicates over I2C, so it needs no analog pin.
Typical lux values for reference:
| Situation | Approximate lux |
|---|---|
| Moonlit night | under 1 |
| Living room | 50 to 200 |
| Office desk | 300 to 500 |
| Overcast day outdoors | 1 000 to 10 000 |
| Direct sunlight | 30 000 to 100 000 |
Direct summer sunlight can exceed the BH1750's range, so for outdoor sun measurements, choose a sensor with a wider range.
Wiring
| BH1750 pin | Arduino Uno / Nano |
|---|---|
| VCC | 5 V (the breakout has a regulator) |
| GND | GND |
| SDA | A4 |
| SCL | A5 |
| ADDR | Leave unconnected (address 0x23) |
Connecting ADDR to VCC changes the address to 0x5C, which lets you use two sensors on the same bus. The OLED display in our digital thermometer project shares the same I2C wires without conflict.
Reading lux
Install the "BH1750" library by Christopher Laws from the Library Manager:
#include <Wire.h>
#include <BH1750.h>

BH1750 meter;

void setup() {
  Serial.begin(9600);
  Wire.begin();
  meter.begin();
}

void loop() {
  float lux = meter.readLightLevel();
  Serial.print(lux, 1);
  Serial.println(" lx");
  delay(1000);
}
In the default continuous high-resolution mode, the BH1750 takes about 120 ms per measurement with 1 lux resolution.
Which one should you use?
| LDR | BH1750 | |
|---|---|---|
| Output | Relative analog value | Calibrated lux |
| Interface | 1 analog pin | I2C (2 shared pins) |
| Cost | Very low | Low |
| Consistency between parts | Poor | Good |
| Best for | Dark/bright decisions, light-seeking robots | Logging, plant lighting, displays, measurements |
Choose an LDR for simple switching and for robots that compare light on the left and right to steer toward a flashlight. Choose a BH1750 when you want real numbers, for example to check whether a plant corner gets enough light for the automatic watering system to be worthwhile.
Placement tips
- Face the sensor toward the light you want to measure, not toward nearby LEDs.
- A small diffuser, such as a piece of white plastic, evens out readings from direct sun.
- Log values for a full day before choosing thresholds; light changes more than your eyes suggest.
— TheSolderBench · found a mistake? tell me